Master Administrator Guide
Tenant management is the screen where the master administrator sets the usage of SHIELD Drive features and integration server information for each customer (tenant). Only the features set to be used here will be displayed in that company's SHIELD Drive administrator console and user interface.
Access Permission
Tenant management can only be used by accounts with master privileges (MASTER). When you log in to the admin page with a master account, you will be taken directly to the tenant management screen, and only tenant management will be displayed in the left menu.
- When accessing the general administrator screen such as dashboard and storage management with a master account, an access denied screen is displayed.
- The tenant management menu is not displayed with a general administrator account, and even if you directly enter the address to access it, an access denied screen is displayed.
- Clicking the top SHIELD Drive logo will take you to the tenant management screen.
1. Screen Configuration
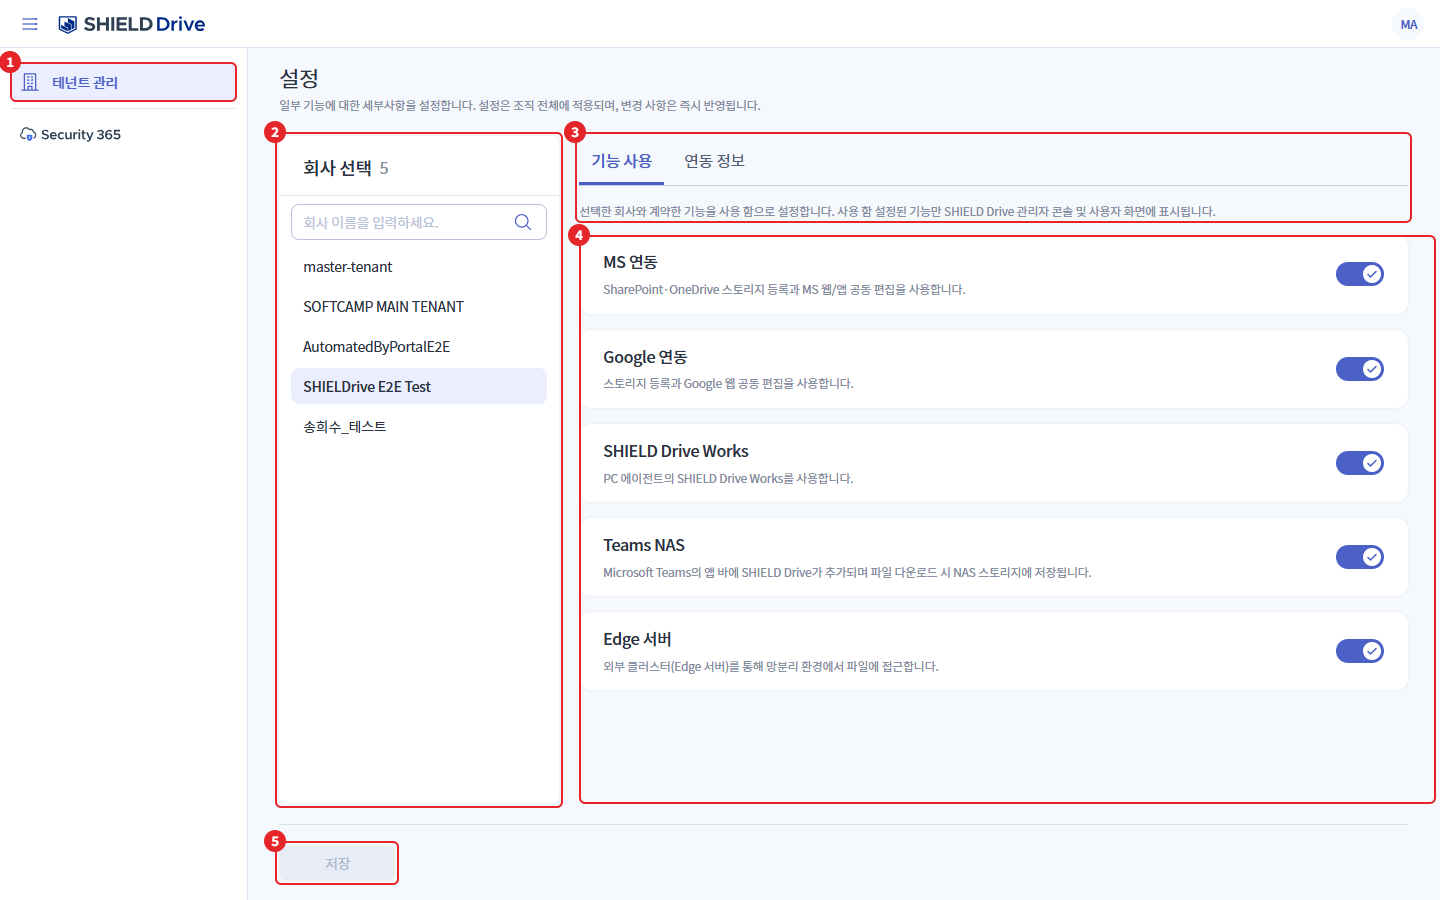
| number | item | Explanation |
|---|---|---|
| 1 | Tenant Management | The only menu displayed to the master administrator. |
| 2 | Company Selection | Select the company to configure. The number next to the title is the total number of companies. |
| 3 | tab | Function Usage / Integration Information is divided into two tabs. Below the tabs, descriptions for each tab are displayed. |
| 4 | Settings Item | The current settings of the selected company are displayed. Change the usage status of each item using the switch. |
| 5 | Save | Save the changes made in the current tab. It will be disabled if there are no changes. |
2. Company Selection
When you select a company to configure from the list on the left, the corresponding configuration values for that company will be loaded on the right. If there are many companies, you can narrow down the list by entering the company name in the search box.
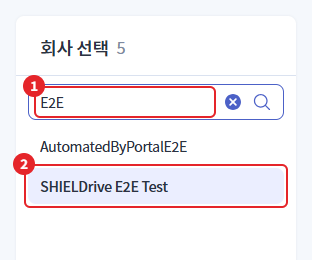
| number | item | Explanation |
|---|---|---|
| 1 | Company Search | If you enter part of the company name (or company ID), only matching companies will be displayed. If there are no matching companies, "No matching companies found." will be displayed. |
| 2 | Selected Company | The company currently being set up is distinguished by background color. |
Caution - Unregistered Company for App Service: If the selected company does not have the SHIELD Drive app service registered, the message "SHIELD Drive app service is not registered, and settings cannot be modified." will be displayed, and all items will be disabled. Please register the app service first in the Security365 Management Center.
3. Feature Settings
Set the features contracted with the selected company to enabled. Only the enabled features will be displayed in the admin console and user interface of that company.
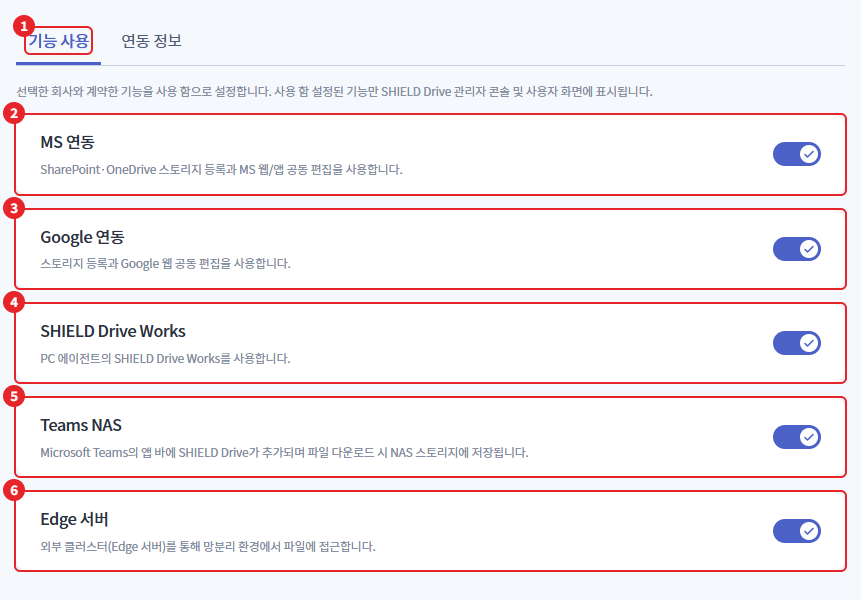
Reference - The above screen is the layout before Teams NAS moved under MS Integration. Currently, Teams NAS is not a separate item and is displayed as a sub-switch under MS Integration when it is turned on. (Refer to 3-1, the changed screen will be attached later)
| number | item | Explanation |
|---|---|---|
| 1 | Feature Usage Tab | This is the tab for setting the availability of features by company. |
| 2 | MS Integration | Use SharePoint·OneDrive storage registration and MS web/app co-editing. When enabled, the Microsoft Teams integration area will appear in the settings > enable section of the company admin page. |
| 3 | Google Integration | Register Google Drive storage and use Google web collaborative editing. |
| 4 | SHIELD Drive Works | Using SHIELD Drive Works of the PC agent. |
| 5 | Teams NAS (MS Integration Sub) | Use NAS storage as the file repository for Microsoft Teams. When enabled, the Microsoft Teams NAS integration area will appear in the settings > enable section of the company's admin page. (Refer to 3-1) |
| 6 | Edge server | Access files in a network-separated environment through an external cluster (Edge server). |
3-1. Teams NAS
Teams NAS is a sub-item of the MS integration item and is only displayed and configurable when the MS integration is turned on.
(Image to be attached later)
| Settings | Company Admin Page Operation |
|---|---|
| use | Settings > Enable display of Microsoft Teams NAS integration area (Teams NAS tab auto-creation, Teams tab name, file storage storage) |
| Not in use | Microsoft Teams NAS Integration Area Not Displayed |
- After turning on Teams NAS, the company administrator must specify the Teams tab name and file storage location to save when enabling automatic creation of the Teams NAS tab in settings. (If automatic creation is not used, it can be saved empty.) Please guide the customer company administrator together.
- If you turn off MS integration, the Teams NAS item will be hidden from the screen, but the setting value will be retained. When you turn MS integration back on, the previous value will be displayed as it is.
4. Integration Information Settings
Set the usage and connection information of the integration server determined during the setup.
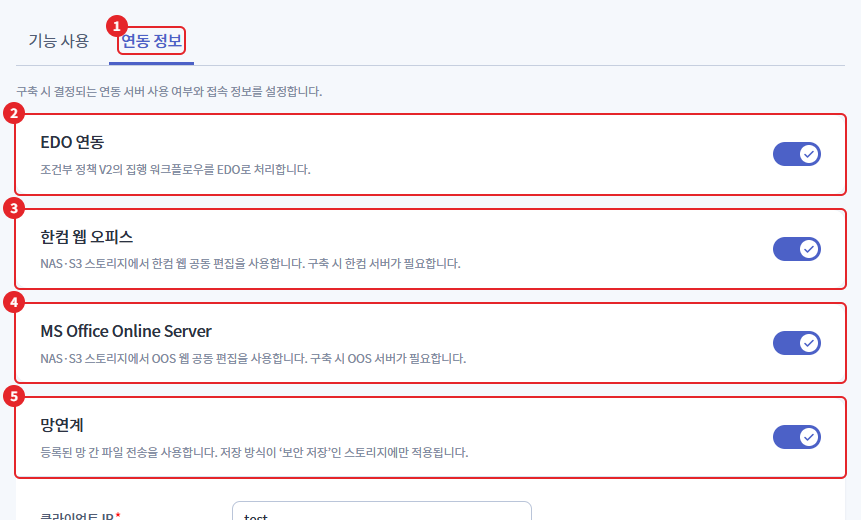
| number | item | Explanation |
|---|---|---|
| 1 | Link Information Tab | This is the tab for setting up integration server information by company. |
| 2 | EDO Integration | The execution workflow of Conditional Policy V2 is processed by EDO. |
| 3 | Hancom Web Office | Use Hancom web co-editing on NAS·S3 storage. A Hancom server is required during setup. |
| 4 | MS Office Online Server | Use OOS web co-editing on NAS·S3 storage. An OOS server is required during setup. |
| 5 | Disaster Recovery | Use registered network-connected file transfer. When turned on, the network interconnection access information input fields will expand below. (Refer to 4-1) |
Caution - Non-existence of linked items: If the selected company does not have the corresponding linked item (built-in profile), an error message "There is no corresponding linked item for the selected company." will be displayed upon saving.
4-1. Inter-network Connection Information
Network linkage is only applied to storage with secure storage. When network linkage is turned on, the access information input fields are displayed, and all required fields (*) must be filled in to save.
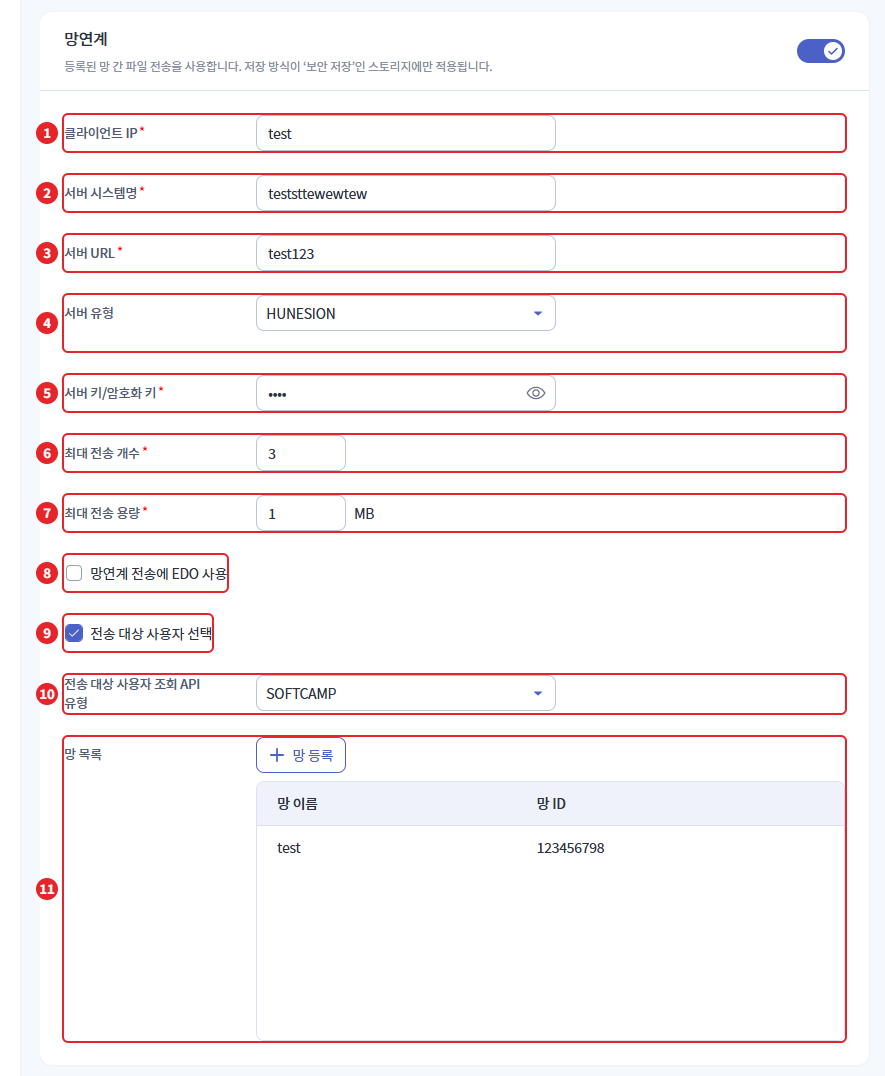
| number | item | Explanation |
|---|---|---|
| 1 | Client IP | This is the client IP that connects to the cross-network server. (Required) |
| 2 | Server System Name | This is the system name of the disaster recovery server. (Required) |
| 3 | Server URL | This is the access address for the interlocking server. (Required) |
| 4 | Server Type | This is a type of interlocking solution. Currently, you can choose HUNESION. |
| 5 | Server Key/Encryption Key | This is the link server key. The default is displayed as hidden, and you can check the value by clicking the eye icon. (Required) |
| 6 | Maximum transmission count | The maximum number of files that can be sent at once. Enter an integer of 1 or more. (Required) |
| 7 | Maximum Transmission Capacity | The maximum capacity that can be sent at once (MB). Please enter a positive integer of 1 or more. (Required) |
| 8 | Using EDO for Interconnected Transmission | Use EDO for interconnection transmission. |
| 9 | Select Target User for Transmission | Allows you to select the recipient when sending. When selected, item 10 appears. |
| 10 | Transmission Target User Query API Type | Select the API type to query the target users for transmission. (SOFTCAMP / HUNESION) |
| 11 | Network List | This is the list of networks to be transmitted. Add with the network registration button, and remove with the delete icon on the right of each row. (Refer to 4-2) |
If a value other than 0 or an integer is entered for the maximum transmission count and capacity, the message "The maximum transmission count and capacity must be entered as integers greater than or equal to 1." will be displayed, and the save button will be disabled.
4-2. Network Registration
When you click the network registration button in the network list, the network registration window opens on the right.
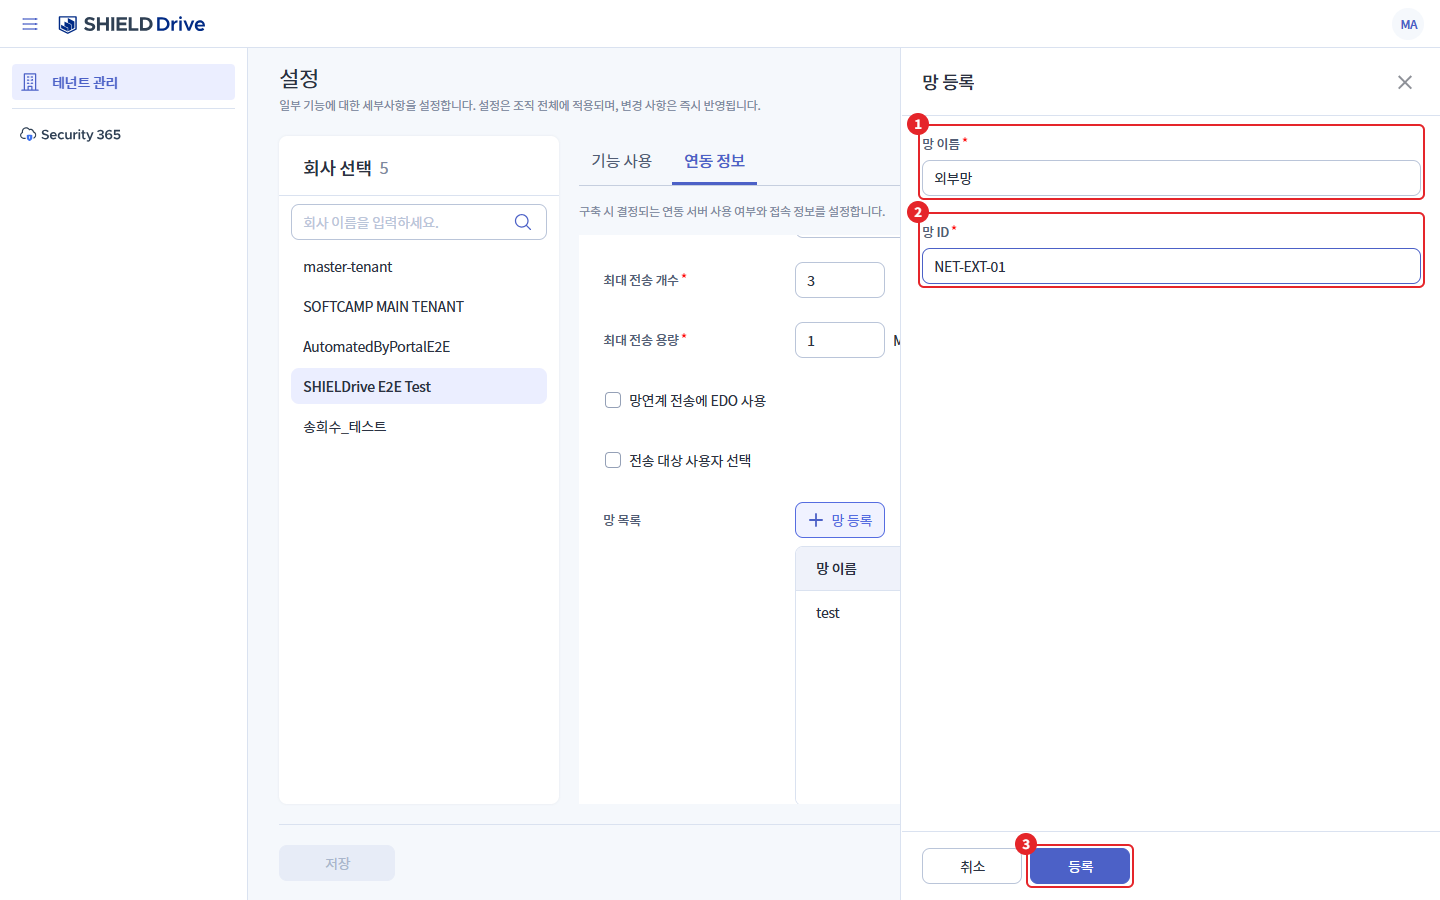
| number | item | Explanation |
|---|---|---|
| 1 | Network Name | This is the name that distinguishes the network. Names that are already in the list cannot be used. (Required) |
| 2 | Network ID | This is the network ID registered on the network-connected server. IDs that are already in the list cannot be used. (Required) |
| 3 | Registration | Entering both the network name and network ID will activate it. Clicking will add it to the network list. |
The registration of the network registration window is the step of adding to the list. To reflect it in the company settings, you must click save at the bottom of the integration information tab.
5. Save and Confirmation Window
Saving operates on a tab basis. The feature usage tab and the linked information tab must be saved separately, and once saved, it will be immediately reflected in the selected company. During the saving process, company selection and setting changes are locked.
5-1. Turning Off the Feature in Use
If you turn off the feature that was on and save, a confirmation window will appear. The feature will disappear from the company's admin console and user screen, so please check if it is the correct target to turn off before proceeding.
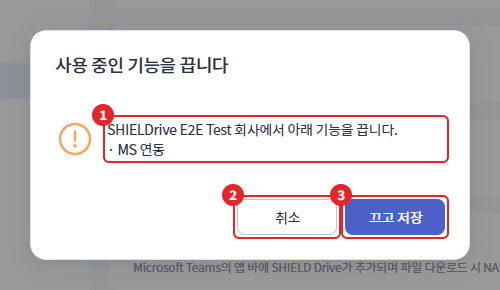
| number | item | Explanation |
|---|---|---|
| 1 | Target Company · Function | The company name to turn off the feature and the list of features that are turned off will be displayed. Even if you turn off Teams NAS under MS integration, it will be displayed in the list. |
| 2 | Cancel | Returning to the settings screen without saving. The changed values remain on the screen as they are. |
| 3 | Turn off and save | Turn off the feature and save. |
5-2. When Moving Without Saving
If you select another company, switch tabs, or navigate to another screen without saving changes, a confirmation dialog will be displayed.
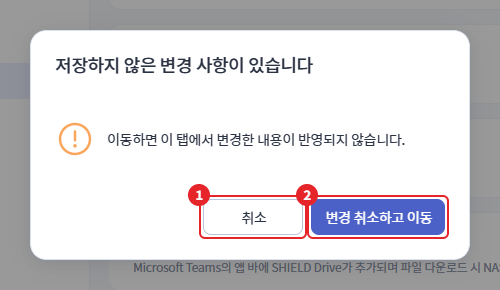
| number | item | Explanation |
|---|---|---|
| 1 | Cancel | Stays on the current screen without moving. |
| 2 | Cancel changes and move | Abandoning the changes and moving on. |
If there are unsaved changes when you refresh the browser or close the window, a browser confirmation dialog will be displayed.
5-3. Save Result Guide
| situation | Guide |
|---|---|
| Save successful | A save completion notification will be displayed. |
| Save only some items | If saving multiple items at once fails in the middle, "{n} items were saved, but the remaining items failed to save." will be displayed. The saved items will remain as they are, so please check the values and save the remaining items again. |
| Save failed | The reason for failure will be displayed as a notification. |
6. Log
The records saved in tenant management are logged in the administrator log.
| Event Code | Event Name | Explanation |
|---|---|---|
| COMPANY_UPDATE | Company Information Change | It is recorded based on the target company. The before and after values for each item, along with the completion/failure status, are retained. |